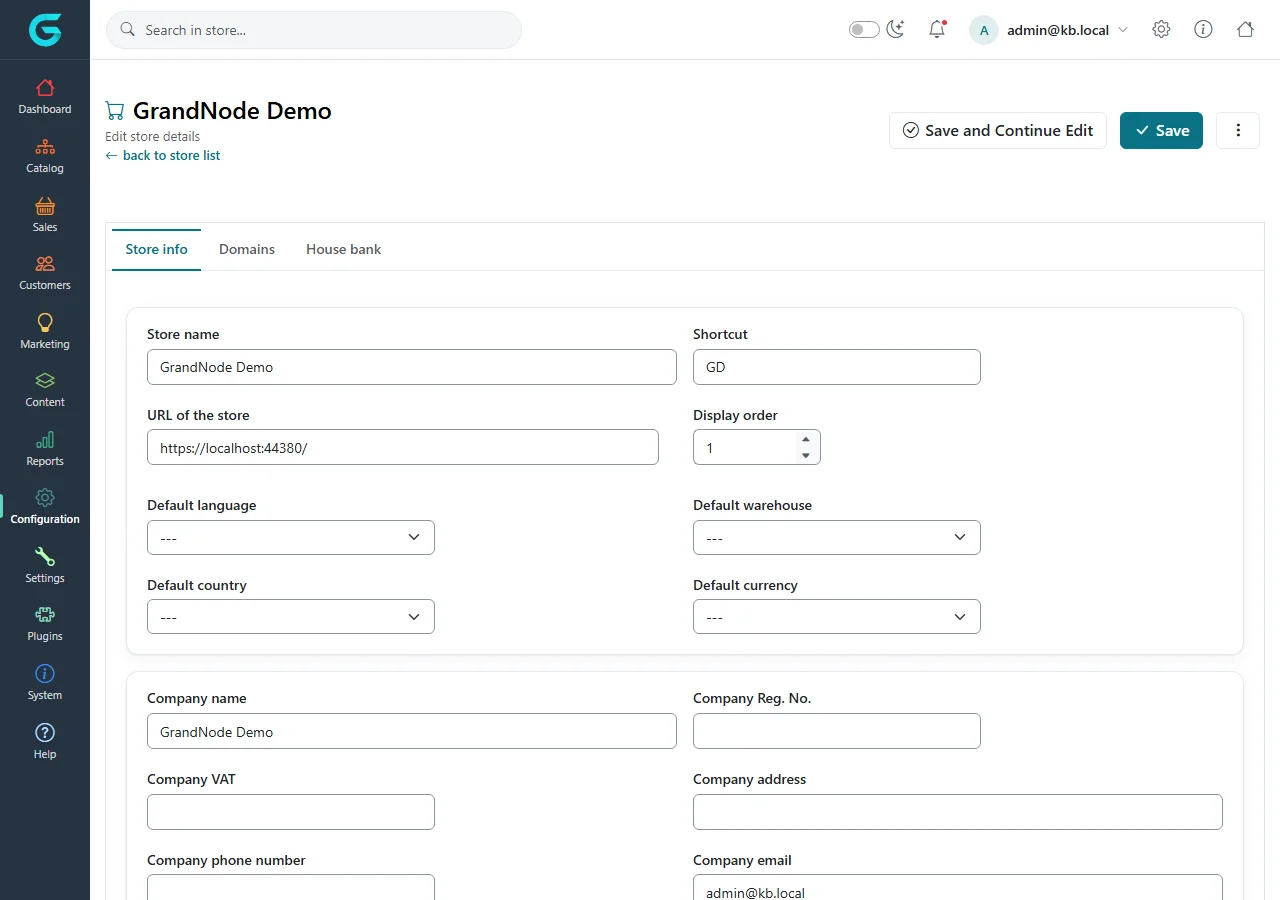
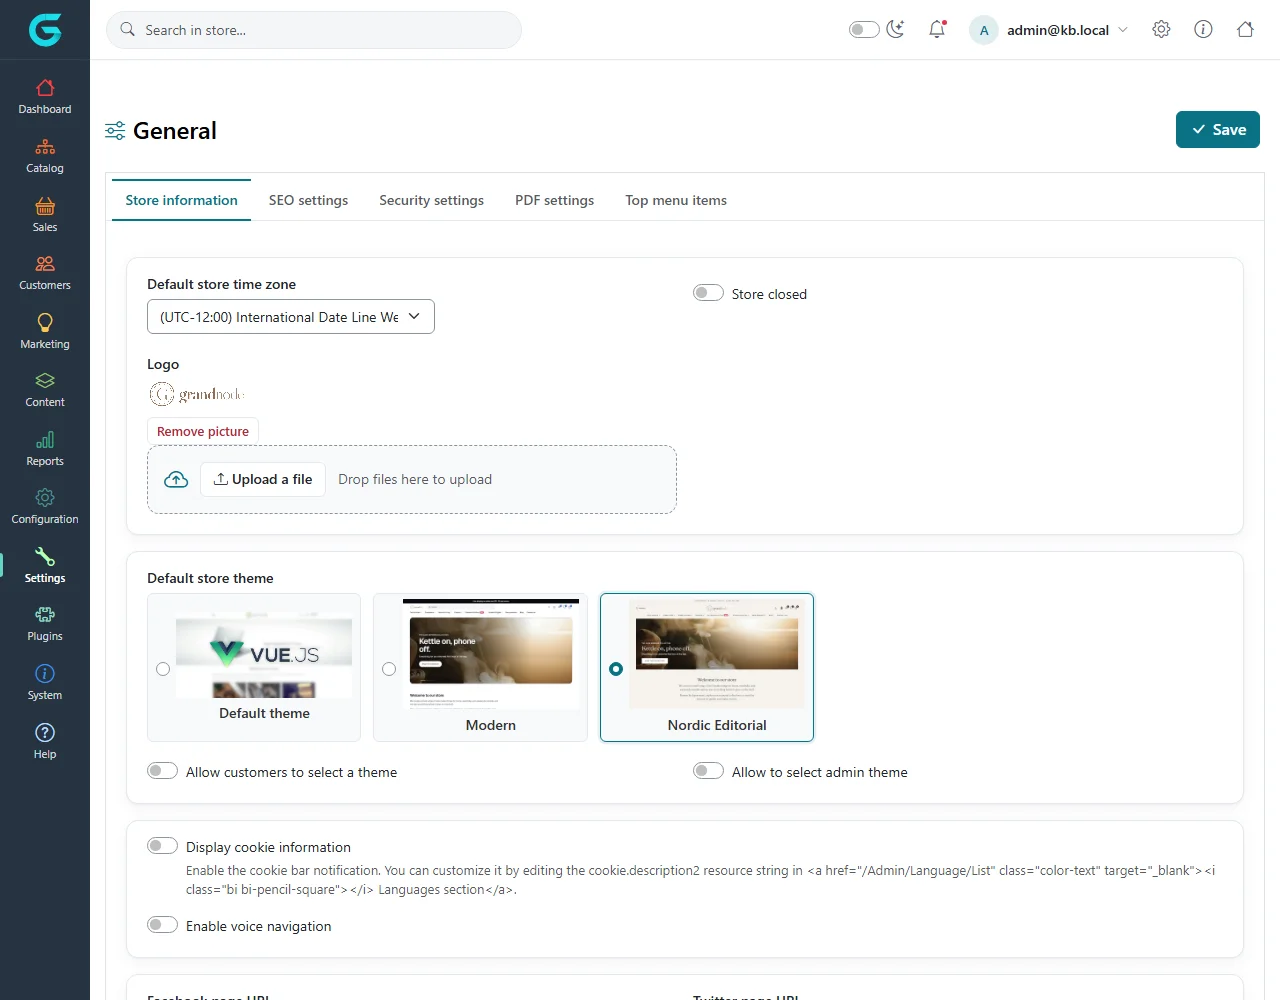
{"ArticleId":null,"Name":"First steps for a new store","Content":"\u003Cp\u003EA fresh GrandNode installation works out of the box, but it is not yet \u003Cem\u003Eyour\u003C/em\u003E store: it is called \u201CYour store name\u201D, it sells in US dollars, and payment and shipping still need your decisions. Work through this checklist in order before you invite customers. Each step names the screen and links to the documentation that covers it in depth.\u003C/p\u003E\n\n\u003Ch2 id=\u00221-store-name-and-url\u0022\u003E1. Store name, URL and company details\u003C/h2\u003E\n\u003Col\u003E\n\u003Cli\u003EGo to \u003Cstrong\u003EConfiguration \u2192 Stores\u003C/strong\u003E and click your store.\u003C/li\u003E\n\u003Cli\u003EOn \u003Cstrong\u003EStore info\u003C/strong\u003E set \u003Cstrong\u003EStore name\u003C/strong\u003E (shown in page titles and emails) and check \u003Cstrong\u003EURL of the store\u003C/strong\u003E \u2014 it must be the public address customers use, including \u003Ccode\u003Ehttps://\u003C/code\u003E. The installer took it from the address you used to open the wizard, which is often \u003Ccode\u003Elocalhost\u003C/code\u003E.\u003C/li\u003E\n\u003Cli\u003ESet \u003Cstrong\u003EDefault language\u003C/strong\u003E, \u003Cstrong\u003EDefault currency\u003C/strong\u003E, \u003Cstrong\u003EDefault country\u003C/strong\u003E and \u003Cstrong\u003EDefault warehouse\u003C/strong\u003E if you want this store to differ from the installation defaults.\u003C/li\u003E\n\u003Cli\u003EFill in the company fields (name, address, VAT, phone, email) \u2014 they appear on invoices.\u003C/li\u003E\n\u003Cli\u003EOn \u003Cstrong\u003EDomains\u003C/strong\u003E add every host name the store answers to and mark the primary one.\u003C/li\u003E\n\u003Cli\u003EPress \u003Cstrong\u003ESave\u003C/strong\u003E.\u003C/li\u003E\n\u003C/ol\u003E\n\u003Cfigure\u003E\u003Cimg src=\u0022/Plugins/Theme.GrandNodeCom/Content/kb/getting-started/store-edit.webp\u0022 alt=\u0022Store edit page with Store info, Domains and House bank tabs; fields Store name, Shortcut, URL of the store and defaults\u0022 width=\u00221280\u0022 height=\u0022900\u0022 loading=\u0022lazy\u0022\u003E\u003Cfigcaption\u003E\u003Cstrong\u003EConfiguration \u2192 Stores\u003C/strong\u003E, the store edit page.\u003C/figcaption\u003E\u003C/figure\u003E\n\n\u003Ch2 id=\u00222-currency\u0022\u003E2. Currency\u003C/h2\u003E\n\u003Cp\u003EUnder \u003Cstrong\u003EConfiguration \u2192 Currencies\u003C/strong\u003E publish the currencies you sell in and unpublish the rest. US Dollar is the primary store currency after installation and Euro is also published. If your prices are in another currency, make it primary \u003Cem\u003Ebefore\u003C/em\u003E entering products \u2014 product prices are stored in the primary currency.\u003C/p\u003E\n\n\u003Ch2 id=\u00223-languages\u0022\u003E3. Languages\u003C/h2\u003E\n\u003Cp\u003EEnglish is installed. Add more under \u003Cstrong\u003EConfiguration \u2192 Languages\u003C/strong\u003E, and import a translation file for each language, or translate texts yourself. Every product, category and page can then be translated.\u003C/p\u003E\n\n\u003Ch2 id=\u00224-email\u0022\u003E4. Email account\u003C/h2\u003E\n\u003Cp\u003EOrder confirmations, password recovery and all notifications are sent through an email account. The installer creates a placeholder (\u003Ccode\u003Etest@mail.com\u003C/code\u003E on \u003Ccode\u003Esmtp.mail.com\u003C/code\u003E) that will not work. Replace it under \u003Cstrong\u003EConfiguration \u2192 Email Accounts\u003C/strong\u003E with your SMTP server and send a test email.\u003C/p\u003E\n\n\u003Ch2 id=\u00225-tax\u0022\u003E5. Tax\u003C/h2\u003E\n\u003Cp\u003EUnder \u003Cstrong\u003EConfiguration \u2192 Tax\u003C/strong\u003E choose a tax provider on \u003Cstrong\u003ETax providers\u003C/strong\u003E (fixed rate, or by country/state/zip), set the rates per tax category, and on \u003Cstrong\u003ETax settings\u003C/strong\u003E decide whether prices include tax and how tax is displayed. The installer creates tax categories such as Home \u0026amp; Living, Electronics \u0026amp; Software, Downloadable Products, Sports \u0026amp; Outdoor and Apparel; rename or add your own.\u003C/p\u003E\n\n\u003Ch2 id=\u00226-shipping\u0022\u003E6. Shipping\u003C/h2\u003E\n\u003Cp\u003EUnder \u003Cstrong\u003EConfiguration \u2192 Shipping\u003C/strong\u003E enable a provider on \u003Cstrong\u003EShipping providers\u003C/strong\u003E \u2014 fixed rate, by weight, or shipping points for pickup \u2014 and configure its rates. The methods Ground, Next Day Air and 2nd Day Air exist already; rename them on \u003Cstrong\u003EShipping methods\u003C/strong\u003E. Add your \u003Cstrong\u003EWarehouses\u003C/strong\u003E and \u003Cstrong\u003EDelivery dates\u003C/strong\u003E, and use \u003Cstrong\u003EShipping restrictions\u003C/strong\u003E to hide methods for certain countries.\u003C/p\u003E\n\n\u003Ch2 id=\u00227-payment\u0022\u003E7. Payment\u003C/h2\u003E\n\u003Cp\u003EUnder \u003Cstrong\u003EConfiguration \u2192 Payment \u2192 Payment methods\u003C/strong\u003E activate and configure at least one method \u2014 Cash on delivery for testing, Stripe Checkout or BrainTree for card payments. Enter the provider\u0027s live keys only when you go live. \u003Cstrong\u003EPayment restrictions\u003C/strong\u003E hides methods for chosen countries or shipping methods.\u003C/p\u003E\n\n\u003Ch2 id=\u00228-theme-and-logo\u0022\u003E8. Theme and logo\u003C/h2\u003E\n\u003Col\u003E\n\u003Cli\u003EGo to \u003Cstrong\u003ESettings \u2192 General\u003C/strong\u003E, tab \u003Cstrong\u003EStore information\u003C/strong\u003E.\u003C/li\u003E\n\u003Cli\u003EUpload your \u003Cstrong\u003ELogo\u003C/strong\u003E.\u003C/li\u003E\n\u003Cli\u003EUnder \u003Cstrong\u003EDefault store theme\u003C/strong\u003E choose Default theme, Modern or Nordic Editorial.\u003C/li\u003E\n\u003Cli\u003ESet \u003Cstrong\u003EDefault store time zone\u003C/strong\u003E, and switch on \u003Cstrong\u003EStore closed\u003C/strong\u003E while you prepare the store \u2014 administrators can still browse it.\u003C/li\u003E\n\u003Cli\u003EPress \u003Cstrong\u003ESave\u003C/strong\u003E.\u003C/li\u003E\n\u003C/ol\u003E\n\u003Cfigure\u003E\u003Cimg src=\u0022/Plugins/Theme.GrandNodeCom/Content/kb/getting-started/settings-general-theme.webp\u0022 alt=\u0022Settings General, Store information tab, with time zone, Store closed, logo upload and the Default store theme picker\u0022 width=\u00221280\u0022 height=\u00221000\u0022 loading=\u0022lazy\u0022\u003E\u003Cfigcaption\u003EThe theme picker shows a preview of each installed theme.\u003C/figcaption\u003E\u003C/figure\u003E\n\n\u003Ch2 id=\u00229-pages\u0022\u003E9. Legal and information pages\u003C/h2\u003E\n\u003Cp\u003EUnder \u003Cstrong\u003EContent \u2192 Landing pages\u003C/strong\u003E review the pages the installer created \u2014 about us, shipping and returns, privacy notice, conditions of use \u2014 and replace the sample text with your own.\u003C/p\u003E\n\n\u003Ch2 id=\u002210-first-product\u0022\u003E10. Your first category and product\u003C/h2\u003E\n\u003Col\u003E\n\u003Cli\u003E\u003Cstrong\u003ECatalog \u2192 Categories\u003C/strong\u003E \u2192 \u003Cstrong\u003EAdd new\u003C/strong\u003E: give the category a name and publish it.\u003C/li\u003E\n\u003Cli\u003E\u003Cstrong\u003ECatalog \u2192 Products\u003C/strong\u003E \u2192 \u003Cstrong\u003EAdd new\u003C/strong\u003E: enter the name, short description, price, SKU, stock, tax category and at least one picture; assign it to the category and publish it.\u003C/li\u003E\n\u003Cli\u003EOpen the storefront and find the product in the category menu.\u003C/li\u003E\n\u003C/ol\u003E\n\u003Cp\u003EThe \u003Ca href=\u0022/docs-catalog\u0022\u003ECatalog\u003C/a\u003E documentation covers product types, attributes, specifications, inventory and prices in detail.\u003C/p\u003E\n\n\u003Ch2 id=\u002211-test-order\u0022\u003E11. Place a test order\u003C/h2\u003E\n\u003Cp\u003ERegister a customer account on the storefront, buy your product with a test payment method and follow the order in \u003Cstrong\u003ESales \u2192 Orders\u003C/strong\u003E: check the emails that arrived, the tax, the shipping cost and the invoice. See \u003Ca href=\u0022/docs-sales\u0022\u003ESales\u003C/a\u003E.\u003C/p\u003E\n\n\u003Ch2 id=\u0022tips-and-common-mistakes\u0022\u003ETips and common mistakes\u003C/h2\u003E\n\u003Cul\u003E\n\u003Cli\u003EChange the primary currency before adding products, not after.\u003C/li\u003E\n\u003Cli\u003EA wrong \u003Cstrong\u003EURL of the store\u003C/strong\u003E breaks links in emails and redirects after payment.\u003C/li\u003E\n\u003Cli\u003EIf you installed sample data, remove or unpublish the demo products, vendor and discounts before going live.\u003C/li\u003E\n\u003C/ul\u003E\n\n\u003Ch2 id=\u0022related\u0022\u003ERelated\u003C/h2\u003E\n\u003Cul\u003E\n\u003Cli\u003E\u003Ca href=\u0022/docs-configuration\u0022\u003EConfiguration\u003C/a\u003E\u003C/li\u003E\n\u003Cli\u003E\u003Ca href=\u0022/docs-catalog\u0022\u003ECatalog\u003C/a\u003E\u003C/li\u003E\n\u003Cli\u003E\u003Ca href=\u0022/docs-sales\u0022\u003ESales\u003C/a\u003E\u003C/li\u003E\n\u003C/ul\u003E","ParentCategoryId":"6abdec6c83d2816248229ea1","SeName":"getting-started-first-steps","MetaKeywords":null,"MetaDescription":"A checklist for a new GrandNode store: store name and URL, currency, languages, email, tax, shipping, payment, theme and your first product.","MetaTitle":null,"AllowComments":false,"Captcha":{"ReCaptchaChallengeField":null,"ReCaptchaResponseField":null,"ReCaptchaResponseValue":null,"ReCaptchaResponse":null},"RelatedArticles":[],"CategoryBreadcrumb":[{"Name":"Getting started","Description":null,"IsCurrent":false,"Children":null,"Parent":null,"SeName":"docs-getting-started","Id":"6abdec6c83d2816248229ea1","UserFields":[]}],"AddNewComment":{"CommentText":null,"DisplayCaptcha":false,"Id":null,"UserFields":[]},"Comments":[],"Id":"6abdec6c83d2816248229ead","UserFields":[]}