

How to create themes in GrandNode 2.0
In this article, we will cover the whole topic about themes creation in ASP.NET Core 5.0 and MongoDB e-commerce platform — GrandNode 2.0,
We can divide this tutorial into two parts. First will cover the all basics about theme structure and the way how it’s managed. In the second case, we will make some moves to create your first theme in GrandNode. 2.0
How to create a theme in GrandNode 2.0
The easiest way to start is to copy the default theme, which is a standard template for GrandNode 2.0. To provide that, navigate to the main folder of GrandNode 2.0 and go to Themes.
How to install a theme in GrandNode 2.0
To be honest, you don’t install them at all. It’s just enough to place them in the correct place in file structure and that’s all. Mostly, you will get the zip package from GrandNode marketplace or if you create your own theme. Just extract the zip to the following folder — Themes.
If you use the source code version, navigate to:
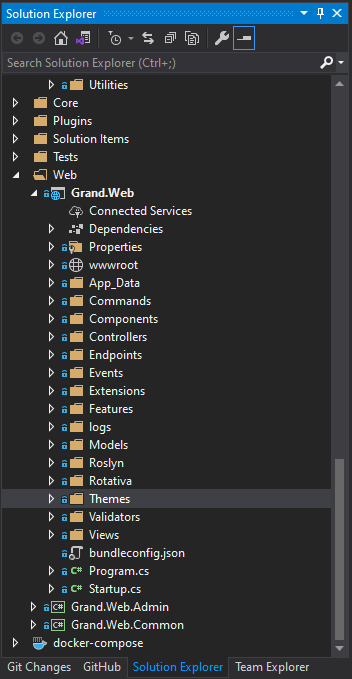
No source (Web) version will be similar, you will have the Grand.Web project content.
It should be placed at the same level as the Default theme. If you place it correctly, you will be able to choose it from the General Settings page. Just navigate to Admin panel -> Settings -> General and mark the box next to your theme.
How to add custom CSS styles or JS scripts?
It’s almost obvious that during the theme creation you will be forced to add custom styles or scripts to your theme. To easier management, you can add custom CSS rules and custom JS scripts, directly from the admin panel. Just go to Admin panel -> System -> Custom JS / Custom CSS.
How to add custom partial view or component
For example, we want to create a custom “ContactUs” file. The results of your work will be able to preview at the following place: https://yourstore.com/contactus
Create a folder called Common in the Views folder which can be found in the main folder of the theme.
Copy the “ContactUs.cshtml” file from default Views folder, which can be found in the Source code of GrandNode 2.0, if you don’t have them, use the GitHub link to download them: https://github.com/grandnode/grandnode2
Now it’s time for customization. It’s similar to other Partials and Components in YourTheme/Views/…
Customize Category, Brand, Page, Collection, or Product layouts
In GrandNode 2.0 it’s possible to customize the mentioned pages easily, even in the GrandNode 2.0 default theme. Out of the box, you can use two views for Brand or Category pages — Grid or lines. It’s also the most common layouts for each e-commerce. But, if you want to change something, for example instead of 3 column grid, insert 5 columns or more, you need to edit the page layout.
- To begin work, we should copy the base file for our new template. Use the default one, available in Views -> Catalog folder. Change its name. For example CategoryLayout.ProductsIn5Grids. In the code editor, make the necessary changes and upload it via FTP client to the following folder — /Themes/YourTheme/Catalog.
- To create a new custom category template we have to navigate to Admin panel -> Configuration -> Layouts -> Category layouts, on the following grid, you should press the “Add new record” button and fill visible fields.
In the Name enter the name of your layout, you can use any kind of custom name. In the second field, View path — provide the file name of your layout.
To use the new category layout we should navigate to Admin panel -> Catalog -> Categories and press the name of category which we want to edit.
And in the Layout field, just set our new one.
According to that example, you can create new templates for Brands, Collections, Products, etc.
How to create an admin panel theme
It’s a pretty advanced feature that allows you to customize the admin panel appearance for every user or store. The whole process is straightforward.
Create a theme directory
In the Grand.Web.Admin/Areas/Admin create a Themes folder and inside it create a directory for your new theme. You should have the following file structure — Areas/Admin/Themes/MyCustomTheme.
The correct theme directory structure
The flow is similar to the storefront theme creation. In the theme catalog, create two directories Content and Views. Content will contain all CSS, JSS files, and Views catalog will contain all CSHTML files for your new theme. If you copy the original file to the theme, it will take the custom file first. If a specified file doesn’t exist in the theme directory, it will be taken from the original Views folder.
Grand.Web.Admin/Areas/Admin/
 ├── Themes/
 │   │   ├──MyCustomTheme/
 │   │   │   ├── Content/
 │   │   │   ├── Views/
Add a _ViewStart.cshtml and _ViewImports.cshtml
In the theme directory, add _ViewStart.cshtml and _ViewImports.cshtml. By default, your theme will inherit from the default admin panel theme.
Copy from existing theme both files to your theme directory. Without them, you won’t be able to run your theme.
How to set the theme for the vendor or entire store?
In GrandNode 2.0 you will see new fields in the store configuration. If you want to assign a specified theme for a particular store and make every store unique with a customized admin panel theme. Open the store configuration page under Configuration -> Stores. And in the Default Admin Theme field provide the name of your newly created theme.
A similar flow is with the vendor theme. Go to Settings -> Vendor and provide the name of the default vendor theme. Don’t forget to enable selecting the admin panel by changing the AllowToSelectAdminTheme from False to True on the General Settings page.
Open beta tests — GrandNode 2.0
Don’t forget to download GrandNode 2.0 beta version directly from our GitHub page: