

Multi-tenancy in GrandNode v2 is something that should be definitely mentioned before the official release. If you've learned about our multi-tenant in GrandNode v1, it's definitely time to get to know what we did in GrandNode v2.
According to Wikipedia the term "software multitenancy" refers to a software architecture in which a single instance of software runs on a server and serves multiple tenants. Systems designed in such a manner are often called shared (in contrast to dedicated or isolated). A tenant is a group of users who share a common access with specific privileges to the software instance. With a multitenant architecture, a software application is designed to provide every tenant a dedicated share of the instance - including its data, configuration, user management, tenant individual functionality, and non-functional properties.
The new multi-tenant system allows even more freedom in creating and managing applications.
Branding - allow the organization to customize the look-and-feel of the application to match its branding
Workflow - allow the organization to personalize the in-store processes, to fir their current workflows.
The new architecture of the system allowed us to design a completely new process of creating tenants. The previously known role-based multi-tenant will disappear with the end of support for GrandNode v1. The diagram below shows a new look at multi-tenant. Roles will be used to manage more restricted permissions in the store.
Furthermore, the current mechanism additionally increases the security of each tenant, due to the fact that every store has its own database and sensitive data files are isolated from the main application.
The new model is presented in the diagram below.
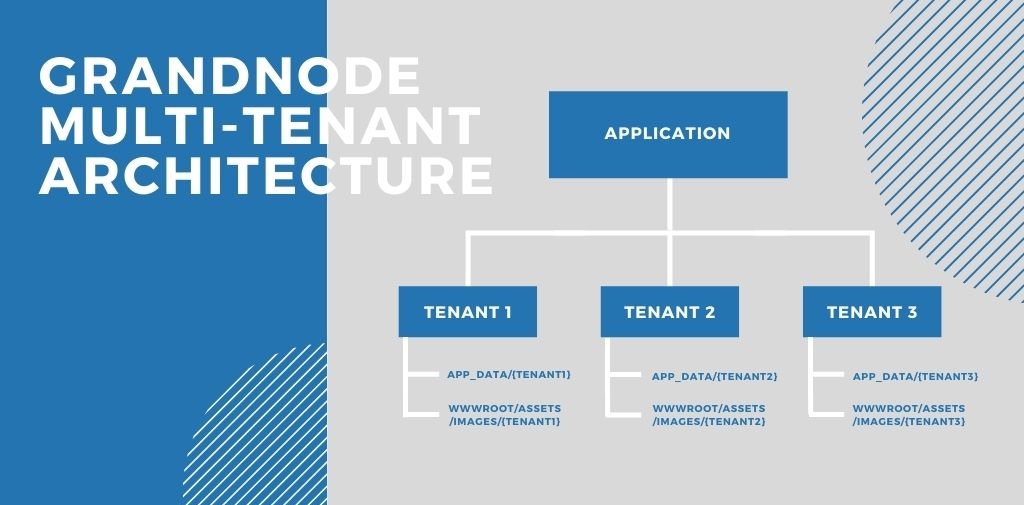
As you can see, you can run a single application, then re-run it with a parameter Directory, which defines the particular tenant. What's more? Once the application has been run with the new parameter, you will find new folders in your GrandNode copy, strictly related to the tenant. In the App_Data main folder, you will find the subdirectory with the tenants' name - i.e "Tenant1". Inside you will find three files - Settings.cfg, InstalledPlugins.cfg and appsettings.json.
Note: If you don't want to use an isolated appsettings.json file, you can delete it, the application will take the default one coming from the main app.
Every tenant will have also their own directory in the wwwroot/assets/Images folder. It means that all pictures are independent for every tenant.
Furthermore, to increase the security of the store you can limit the possibility to upload plugins in the store. To do that, you should look at the appsettings.json file.
To prevent store owners from uploading external extensions, all you need to do is enable the following setting - DisableUploadExtensions.
After that, you need to ensure that ClearPluginShadowDirectoryOnStartup and PluginShadowCopy are set to false.
Why current model instead of the first one, that you may know from GrandNode v1?
First of all - security. Isolated database and sensitive for store files are independent for each store. It means that independently from actions taken on the store, every other store will work fine. Previously, if you destroy something in the store, every tenant goes down.
Customization - basically store owner has full access to the store, he can manage every part of the store.
Multi-store features - every tenant can use the multi-store feature and as a tenant make multi-store marketplaces. In the previous project, it wasn't possible.
Time-efficient - the current model of multi-tenancy gives the administrator a fantastic, time-saving way of making upgrades. If you have 100 tenants, you just make an upgrade once, and every tenant is up-to-date. It will be revealed further.
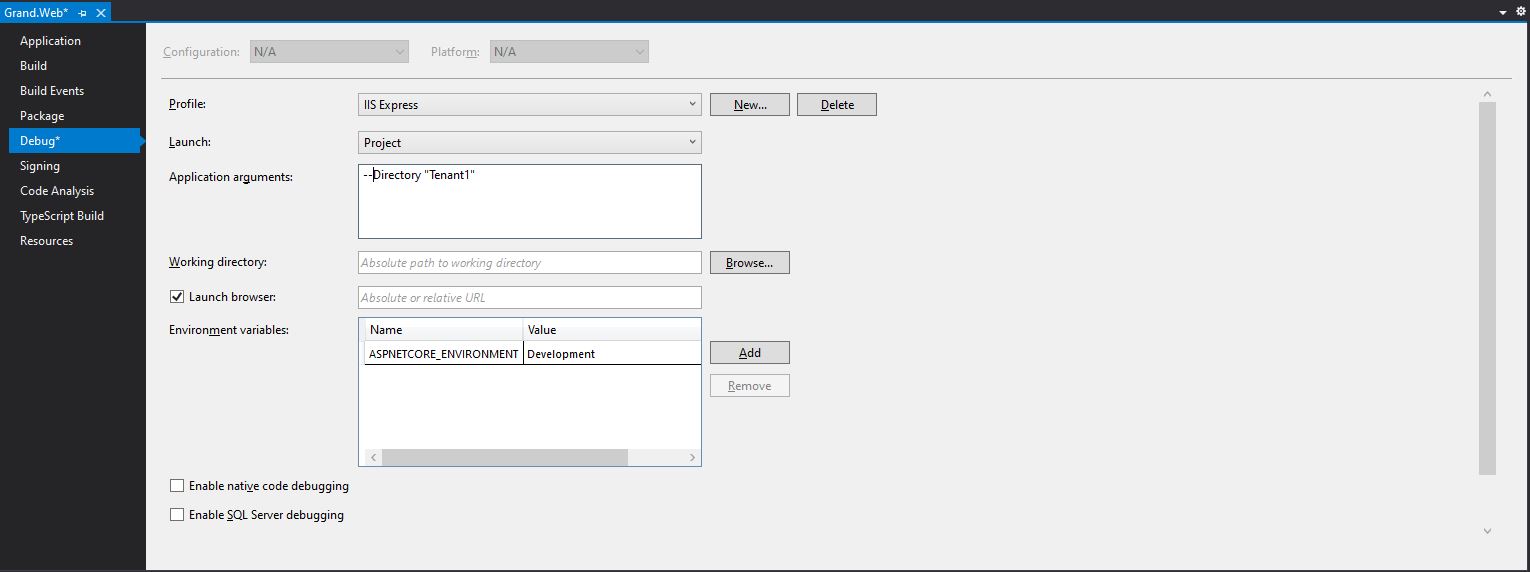
How to run multi-tenant on Visual Studio?
Well, it's super simple. Just edit the Grand.Web project and in the Application arguments section, enter the
--Directory "Tenant1" name.
How to run on Linux?
Similarly, but when you start the service or run the project manually via the command line, add the --Directory "Tenant1" argument. That's all.