

From A to Z Installation and First Steps Guide for MailChimp
List of content
- 1. General overview
- 2. How to install MailChimp
- 3. How to configure MailChimp
- 4. What data can be synchronized
1. General overview
MailChimp integration is one of our latest products. It's very powerful plugin, in the case of increasing store profit. It allows you to synchronize the subscribers automatically and also their history of purchases, abandoned carts. MailChimp will automatically calculate the revenue of each customer.
2. How to install MailChimp
Installation process is very simple, it's always the same scenaririo. You can follow the instruction below and the installation won't have secrets from you:
- Go to Admin panel, then navigate to Configuration -> Local plugins.
- In the top right corner click the "Upload" button. from the file uploader, choose the purchased plugin.
- After successful upload, you will be able to install it.
- The plugin is displayed in the Plugins windows (Configuration → Plugins → Local Plugins). You are able to start the configuration process.
3. How to configure MailChimp
After successful installation, you will be able to configure your MailChimp integration. To enter to the Configuration screen, enter the Plugin list and find the MailChimp plugin, click the Configure button below the name of the plugin. Configuration screen is very simple. We will be forced to provide few things. First of all, we need the API Key, then Audience ID of our subscriber list, where our subscribers will be imported. Last two things are settings to allow to pass e-commerce data like orders, abandoned shopping carts and possibility to auto synchronize the data from store to MailChimp.

At the beginning it's time to get API Key. I assume that you've already have the MailChimp account. Login to it and in the top right corner, go to Profile or Account section. Then from the "Extras" dropdown select the "API Keys" link.

Below mentioned Extras dropdown menu with desired link.

To create new API Keys, just scroll down to "Your API keys" section, create the gray button - "Create A Key". After page refresh, copy the API Key from its field.

Copy and paste it to GrandNode plugin configuration, first field in the Configuration screen is used to store the API Key. In the next step, we will gather the Audience ID for our newsletter subscribers list. You may find it at Audience section, at the Manage Audience -> Settings

Audience ID will be vissible at the bottom of the settings page

As in the previous case, copy it and paste it to the plugin configuration. We recommend to check also both settings. First is used to pass the e-commerce data like orders (orders total, ordered products), abandoned carts, Fist one share additional data and enable more customer mail actions.

When click save, plugin will suggest to restart application. After restarting, time for first manual synchronization. This is obligatory action!

Plugin is ready to be used. Keep in mind, task is included to synchronize your customers automatically.
4. What data can be synchronized
Instead of subscribers, you are able to pass the e-commerce data to MailChimp. When I say e-commerce data, I think about:
- products,
- orders,
- abandoned carts.
It's very powerful tool to provide advanced email campaigns based on revenue, purchased items or general score of user.
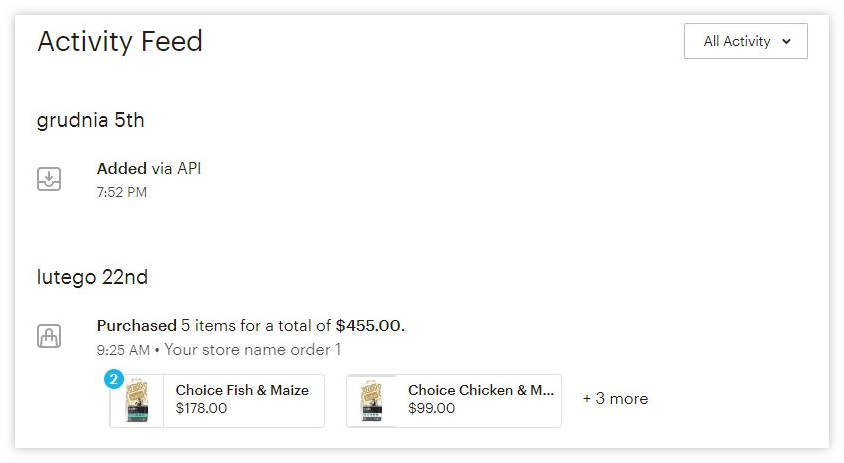
Below you can find an example, how MailChimp presents the activity of your imported customers. What's important, MailChimp imports also historical data.
MailChimp integration for GrandNode can be found on our official marketplace here: https://grandnode.com/mailchimp-integration
Additional manual page is available here: http://docs.grandnode.com/mailchimp
Leave your comment