

Updated on: 20.04.2024
From A to Z Installation Guide for GrandNode
PLEASE NOTE THAT THE INSTALLATION GUIDE IS FOR GRANDNODE 2.0.
List of content
- 1. General overview
- 2. Manual installation
- Linux installation from source code
- Linux installation without source code
- Windows installation without source code
- Docker installation
- 3. How to install GrandNode on Mac OS X
- 4. Common issues during the installation process
- 5. Custom installation
1. General overview
GrandNode 2.0 is the most advanced open-source e-commerce platform based on ASP.NET Core and MongoDB. It's a versatile e-commerce platform designed for the majority of online businesses, with out of the box features like multi-tenant, multi-vendor, multi-store, memberships and subscriptions, B2B features and many, many more.
GrandNode System Requirements
Before we start describing the installation processes please be sure that you meet GrandNode system requirements.
First of all let’s start with the supported browsers because without browser you won’t be able to see the GrandNode.
We support the latest released and stable browsers, such as:
- Mozilla Firefox
- Google Chrome
- Microsoft Edge
- Opera
- Safari
Windows System Requirements
GrandNode with .NET Core 8.0 version can be installed on the following versions:
- Windows 10 (version 1607+)- Windows 11
- Windows Server 2016+
To install GrandNode with success you will need to install a database server also, we support:
- MongoDB 4.00 or above
Finally, to run it on a Windows Server, you need to have:
- IIS at least in version 8.0 or above
If you are a programmer, you will have to install Microsoft Visual Studio 2022 with installed .NET Core 8.0 libraries.
Linux System Requirements
Below you will find the complete list of supported operating systems:
- Red Hat Enterprise Linux, CentOS, Oracle Linux – 7 – x64
- Fedora – 29, 30 – x64
- Debian – 9+ – x64, ARM32, ARM64
- Ubuntu – 18.04, 20.04 – x64, ARM32, ARM64
- Linux Mint – 18+ – x64
- openSUSE – 15+ - x64
- SUSE Enterprise Linux (SLES) – 12 SP2+ -x64
- Alpine Linux – 3.8+ - x64, ARM64
If you have the operating system installed, it’s time to install the server. We recommend to use the following one:
- nginx 1.14.0
If you want to host the MongoDB on the same server, you need to install MongoDB server – at least MongoDB 4.0 or higher.
macOS System Requirements
It’s possible to install GrandNode on Mac OS X. It’s dedicated mostly for developers, here is the supported operating system version:
- Mac OS X in version 10.13+ - x64
On Mac OS you will have to download also Visual Studio for Mac with .NET Core SDK for Mac. Download Visual Studio. https://www.visualstudio.com/vs/visual-studio-mac/
2. Manual Installation
Linux Installation from source code
Manual installations are always more tricky than the automated ones, but with our installation guide, you will master this process for good. Please note that in this guide, we're using the newest version of GrandNode with ASP.NET Core 8.0. It's still in the development process, but it will be released at the end of the year, so we've decided to create the installation guide only for the updated version. If you have problems with older versions of GrandNode. Please let us know in the comments or write a post on the community forum.
This part will cover How to run GrandNode on Ubuntu 20.04, if you want, we are looking for contributors who prepare guides for other distributions of Linux. Let’s start from the beginning. Of course, I suppose that you have running Ubuntu 20.04. Open the command line and let’s roll the magic. In the first step, you will learn how to download GrandNode from GitHub.
In the command line, please enter the following commands:
mkdir ~/source
cd ~/source
git clone - b x.x.x https://github.com/grandnode/grandnode2.git
In the x.xx place, please enter the current version of GrandNode. The number for the newest release can be found in GrandNode release notes.
This command will clone the latest stable version of GrandNode. Please note that you can always download the latest development version of GrandNode, if you are a developer and want to contribute in our project, just remove the parameters from the command above and use the: git clone https://github.com/grandnode/grandnode2.git
In the next step, we will install the latest version of Nginx. We will use it to host GrandNode.
How to install Nginx on Ubuntu 20.04, probably it's your next question. The best information for you is that Nginx comes with Ubuntu’s default repositories, so we can install it with the apt packaging system. Just update your local package index and install it with:
sudo apt update
sudo apt install nginx
And that’s all. Simple. Now it’s time to create our development environment.
Let’s install the ASP.NET Core 8.0.
wget -q https://packages.microsoft.com/config/ubuntu/20.04/packages-microsoft-prod.deb -O packages-microsoft-prod.deb
sudo dpkg -i packages-microsoft-prod.deb
Above steps are done only once per machine, so if you have done it previously you don’t have to do it again.
Now we will install the .NET SDK, but first we want to update the products available for installation:
sudo add-apt-repository universe
sudo apt-get update
sudo apt-get install apt-transport-https
sudo apt-get install dotnet-sdk-8.0
Now it’s time to prepare a directories for our website. We need to create the main catalog for GrandNode, to perform that, please use the following command:
mkdir /var/webapps
Now it’s time to run our magic and run GrandNode. We need to go to our application’s root directory. We will be able to pull in/download all the required NuGet packages, let’s do that now.
cd ~/source/grandnode
dotnet restore GrandNode.sln
You can take a sip of coffee, it may take a while. After that action, we can continue our spells. Provide the following code:
sudo dotnet build src/Plugins/Authentication.Facebook && sudo dotnet build src/Plugins/Authentication.Google && sudo dotnet build src/Plugins/DiscountRules.Standard && sudo dotnet build src/Plugins/ExchangeRate.McExchange && sudo dotnet build src/Plugins/Payments.BrainTree && sudo dotnet build src/Plugins/Payments.CashOnDelivery && sudo dotnet build src/Plugins/Payments.StripeCheckout && sudo dotnet build src/Plugins/Shipping.ByWeight && sudo dotnet build src/Plugins/Shipping.FixedRateShipping && sudo dotnet build src/Plugins/Shipping.ShippingPoint && sudo dotnet build src/Plugins/Tax.CountryStateZip && sudo dotnet build src/Plugins/Tax.FixedRate && sudo dotnet build src/Plugins/Widgets.FacebookPixel && sudo dotnet build src/Plugins/Widgets.GoogleAnalytics && sudo dotnet build src/Plugins/Widgets.Slider && sudo dotnet build src/Plugins/Theme.Modern && sudo dotnet publish src/Web/Grand.Web -c Release -o /var/webapps/grandnode
Pretty long, but this simple && characters, will run your commands one by one, it will save your time and automate this process a little. The last command is used to copy the compiled version of GrandNode to our application directory, created in the previous step.
Please note, sometimes you can face problems with pasted commands execution. In that case, please rewrite the command manually. In most cases, it does the trick and executes commands.
Let’s wait with the fireworks, it’s time to give proper permissions to our user and that user will run our service:
sudo chown –R www-data:www-data /var/webapps/grandnode
Now it’s time to automate the whole process. We need to create a systemd file, to create a daemon (service) init script, we will use VIM:
sudo vi /etc/systemd/system/grandnode.service
And below is prepared an example service file, you can copy it and use:
[Unit]
Description=GrandNode 2.0
[Service]
WorkingDirectory=/var/webapps/grandnode
ExecStart=/usr/bin/dotnet /var/webapps/grandnode/Grand.Web.dll
Restart=always
RestartSec=10
SyslogIdentifier=dotnet-grandnode
User=www-data
Environment=ASPNETCORE_ENVIRONMENT=Production
[Install]
WantedBy=multi-user.target
Press ESC and enter :wq to save changes and exit from the editor. After successful creation, we need to enable and start service:
sudo systemctl enable grandnode.service
sudo systemctl start grandnode.service
Now the most tricky part. Everything works fine, but we are not able to connect with our GrandNode from our computer. The reason is simple, GrandNode is running locally on our machine on port 5000. In this example, we will present the simplest way of reverse-proxy traffic to your application. It will forward traffic from port 80 to your local machine on port 5000.
Open the nginx configuration with VIM or favourite text editor:
sudo vi /etc/nginx/conf.d/default.conf
The simplest way is to replace the content of file, delete current content and paste this one:
server {
listen 80;
location / {
proxy_pass http://localhost:5000;
proxy_http_version 1.1;
proxy_set_header Upgrade $http_upgrade;
proxy_set_header Connection keep-alive;
proxy_set_header Host $host;
proxy_cache_bypass $http_upgrade;
}
}
As before, press ESC and write :wq to exit and save changes. With the VIM editor open next file – proxy.conf to configure it.
proxy_redirect off;
proxy_set_header Host $host;
proxy_set_header X-Real-IP $remote_addr;
proxy_set_header X-Forwarded-For $proxy_add_x_forwarded_for;
proxy_set_header X-Forwarded-Proto $scheme;
client_max_body_size 10m;
client_body_buffer_size 128k;
proxy_connect_timeout 90;
proxy_send_timeout 90;
proxy_read_timeout 90;
proxy_buffers 32 4k;
As previous, exit and save changes. By default we won’t be able to use this file, we need to include it to the general nginx config. Open following file:
sudo vi /etc/nginx/nginx.conf
Below the http { line paste the following code include /etc/nginx/proxy.conf, as it’s shown below.
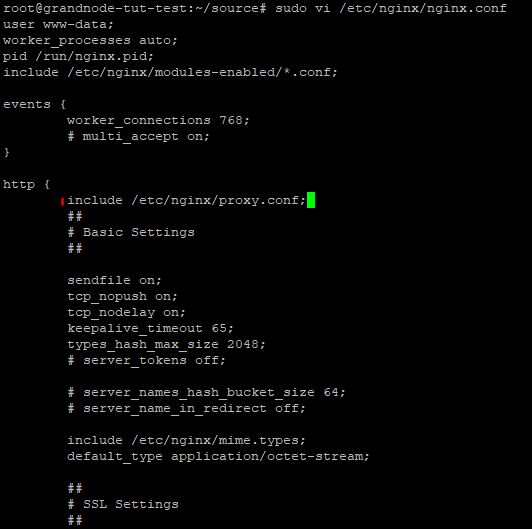
In the same file, we can make one thing to improve GrandNode performance. Please look for the commented section "GZIP Settings". Just remove all # marks from the beginnings of the lines. It will allow us, to use the gzip compression for GrandNode.
Save changes as earlier. Now check the Nginx configuration with the following command:
sudo nginx –t
If everything is ok, you will be able to reload the Nginx configuration. You can do it by running:
sudo systemctl reload nginx.service
Let’s install last packages, firstly we will install the missing libgdiplus package, run the following command:
sudo apt-get –y install libgdiplus && sudo ln -s /lib/x86_64-linux-gnu/libdl.so.2 /lib/x86_64-linux-gnu/libdl.so
Now it’s time to manage how to install MongoDB on Ubuntu. MongoDB installation process is based on the official MongoDB installation guide. And this way of installation is highly recommended.
Import the public key used by the package management system, you can do it by running the following command:
wget -qO - https://www.mongodb.org/static/pgp/server-4.4.asc | sudo apt-key add -
Now we need to create a list file for MongoDB, it’s appropriate for Ubuntu 20.04:
echo "deb [ arch=amd64,arm64 ] https://repo.mongodb.org/apt/ubuntu focal/mongodb-org/4.4 multiverse" | sudo tee /etc/apt/sources.list.d/mongodb-org-4.4.list
The installation process is very simple, we need to run two commands:
sudo apt-get update && sudo apt-get install -y mongodb-org=4.4.1 mongodb-org-server=4.4.1 mongodb-org-shell=4.4.1 mongodb-org-mongos=4.4.1 mongodb-org-tools=4.4.1
After successful installation we will be able to enable and start it:
sudo systemctl enable mongod.service && sudo systemctl start mongod.service
Everything is done, so now it's time to run GrandNode! Open the IP of your server and you will see the installation screen of GrandNode. Provide the necessary information, such as:
- Admin e-mail and password
- Mark the checkbox if you want to install sample data
- Fill the server name, by default its localhost:27017,
- Enter the name of the database and finally leave the username and password fields empty.
- Specify also the Collation
Linux installation without source code
This way of installation is the faster one and is recommended for non-developer users. At this point, we won't use the source code of GrandNode, so we won't have to build a solution, build plugins and publish them, we will just learn how to install Nginx, how to run MongoDB and how to install GrandNode.
I assume that you've created your machine, in my case, it will be Ubuntu 20.04, so we will learn how to run GrandNode on Ubuntu 20.04. Let's start with the Nginx installation. As it was provided in the previous way of installation. Nginx comes with the default package in Ubuntu. So to install it, just run the following commands:
sudo apt update
sudo apt install nginx
Counter is running, so we have to speed up, to perform the fastest way of GrandNode installation. Now, let's install the MongoDB server to enable data storage. Add the keys of MongoDB package and create list file with:
wget -qO - https://www.mongodb.org/static/pgp/server-4.4.asc | sudo apt-key add - && echo "deb [ arch=amd64,arm64 ] https://repo.mongodb.org/apt/ubuntu focal/mongodb-org/4.4 multiverse" | sudo tee /etc/apt/sources.list.d/mongodb-org-4.4.list
As previously, we will use the combined commands with &&. Update packages and install MongoDB on Ubuntu
sudo apt-get update && sudo apt-get install -y mongodb-org=4.4.1 mongodb-org-server=4.4.1 mongodb-org-shell=4.4.1 mongodb-org-mongos=4.4.1 mongodb-org-tools=4.4.1
It will install MongoDB and you will be able to enable and start service.
sudo systemctl enable mongod.service && sudo systemctl start mongod.service
We've installed nginx, we've installed MongoDB and now it's time to install .NET Core 8.0, without it, we won't be able to run GrandNode. Following commands have to be done only once per machine:
wget -q https://packages.microsoft.com/config/ubuntu/20.04/packages-microsoft-prod.deb -O packages-microsoft-prod.deb
sudo dpkg -i packages-microsoft-prod.deb
Let's download .NET Core.
sudo add-apt-repository universe
sudo apt-get update
sudo apt-get install apt-transport-https
sudo apt-get install dotnet-runtime-8.0
Everything should be done without problems, so now it's time to download the latest version of GrandNode. To perform that, we will use the standard command:
wget https://github.com/grandnode/grandnode2/releases/download/2.2.0/GrandNode2-2.2.0_NoSource.zip
Now it's possible that we have to install missing packages for unzipping, if you have it, just skip that step. Install it:
sudo apt-get install unzip
Now, let's unpack the GrandNode package.
unzip GrandNode2-2.2.0_NoSource.zip -d /var/webapps/grandnode
Remove zip package with:
sudo rm GrandNode2-2.2.0_NoSource.zip
We're almost done! To provide more automation to our application, we will create service for GrandNode, to achieve that, create the service file:
sudo vi /etc/systemd/system/grandnode.service
Then inside it, please paste the following content:
[Unit]
Description=GrandNode 2.0
[Service]
WorkingDirectory=/var/webapps/grandnode
ExecStart=/usr/bin/dotnet /var/webapps/grandnode/Grand.Web.dll
Restart=always
RestartSec=10
SyslogIdentifier=dotnet-grandnode
User=www-data
Environment=ASPNETCORE_ENVIRONMENT=Production
[Install]
WantedBy=multi-user.target
Press ESC and enter :wq to save changes and exit from the editor. After successful creation, we need to enable and start service:
sudo systemctl enable grandnode.service
sudo systemctl start grandnode.service
Let's assing correct permissions to our GrandNode directory with:
sudo chown -R www-data:www-data /var/webapps/grandnode
Now the most tricky part. Everything works fine, but we are not able to connect with our GrandNode from our computer. The reason is simple, GrandNode is running locally on our machine on port 5000. In this example, we will present the simplest way of reverse-proxy traffic to your application. It will forward traffic from port 80 to your local machine on port 5000.
Open the nginx configuration with VIM or favourite text editor:
sudo vi /etc/nginx/conf.d/default.conf
The simplest way is to replace the content of file, delete current content and paste this one:
server {
listen 80;
location / {
proxy_pass http://localhost:5000;
proxy_http_version 1.1;
proxy_set_header Upgrade $http_upgrade;
proxy_set_header Connection keep-alive;
proxy_set_header Host $host;
proxy_cache_bypass $http_upgrade;
}
}
As before, press ESC and write :wq to exit and save changes. With the VIM editor open next file – proxy.conf to configure it.
proxy_redirect off;
proxy_set_header Host $host;
proxy_set_header X-Real-IP $remote_addr;
proxy_set_header X-Forwarded-For $proxy_add_x_forwarded_for;
proxy_set_header X-Forwarded-Proto $scheme;
client_max_body_size 10m;
client_body_buffer_size 128k;
proxy_connect_timeout 90;
proxy_send_timeout 90;
proxy_read_timeout 90;
proxy_buffers 32 4k;
As previous, exit and save changes. By default we won’t be able to use this file, we need to include it to the general nginx config. Open the following file:
sudo vi /etc/nginx/nginx.conf
Below the http { line paste the following code include /etc/nginx/proxy.conf, as it’s shown below.

In the same file, we can make one thing to improve the loading speed of GrandNode. Please look for the commented section "GZIP Settings". Just remove all # marks from the beginnings of the lines. It will allow us, to use the gzip compression for GrandNode. Save changes as earlier. Now check the nginx configuration with the following command:
sudo nginx –t
If everything is ok, you will be able to reload the Nginx configuration. You can do it by running:
sudo systemctl reload nginx.service
The last thing, that we should do is to enable the firewall, run the following commands:
ufw enable
ufw allow www
And open your website! We're done! Everything is done, so now it's time to run GrandNode! Open the IP of your server and you will see the installation screen of GrandNode. Provide the necessary information, such as:
- Admin e-mail and password
- Mark the checkbox if you want to install sample data
- Fill in the server name, by default its localhost:27017,
- Enter the name of the database and finally leave the username and password fields empty.
- Specify also the Collation
Windows installation without source code
Before start, you should download GrandNode from download page.
We won't cover the whole stuff related to configuring the IIS Sites.
- Install the .NET Core Hosting Bundle on Windows Server.
- Install the MongoDB Server
- Create an IIS site in IIS Manager.
- Deploy GrandNode
When you successfully downloaded the No Source (Web) version, you are able to upload it to your server. Basically, no source version is a ready-to-use pre-compiles version of GrandNode.
Upload GrandNode files
In the next step, you should upload downloaded files to your server. To do this, you will need an FTP connection that will allow you to transfer files between computers, or use the RDP to download GrandNode directly to your server.
Install GrandNode
It's the same process as always. Just fill the necessary fields and press the install button.
Docker installation
Docker installation is very simple. Basically it can be wrapped into two commands. We will use two different docker containers for GrandNode and MongoDB and then, we will link MongoDB to our e-commerce platform.
Let's start with the first command, I assume that you have Docker installed and running. First thing will be a MongoDB container installation, to perform that action, you should use the following command:
docker run -d -p 127.0.0.1:27017:27017 --name mongodb mongo
It will install MongoDB, please remember the name of your container, because it will be used as a MongoDB server name. In the next step, we will download the latest developed version of GrandNode and link installed MongoDB with it. You can do it with:
docker run -d -p 80:8080 --name grandnode --link mongodb:mongo grandnode/grandnode2:latest
Now take your server address and jump into the browser, paste the IP address, and check if it works. It should open the installation screen of GrandNode. Provide the necessary information, such as:
- Admin e-mail and password
- Mark the checkbox if you want to install sample data
- Fill the server name, it's your name of MongoDB container, provided in the previous steps,
- Enter the name of the database and finally leave the username and password fields empty.
- Specify also the Collation
Please note, that command used above will download the latest development version of GrandNode. So it's an unsupported version, recommended only for C# developers. If you want to download the latest stable version of GrandNode please use the following command, where x.x.x is a number of GrandNode release:
docker pull grandnode/grandnode2:x.x.x
If you don't know which number you should enter in that place, check the GrandNode release notes.
4. How to install GrandNode on Mac?
It's normal that this type of installation is used only by passionate and developers. The single-user probably would choose the Linux or Windows servers. It's a logical point of view. But as you know, GrandNode is an open-source cross-platform solution, so it's possible to develop it also on Mac OS. Please check the MacOS system requirements, Let's start with the ASP.NET Core 8.0 SDK installation. To get the newest package of ASP.NET Core, please go to the official Microsoft website and download it from the following address:
https://dotnet.microsoft.com/download/dotnet/8.0
Please note that it's already installed with the newest version of Microsoft Visual Studio for Mac, so if you keep this software up-to-date, probably you have it installed and you can go to the next step. If not, please install the mentioned SDK.
First of all, please download the newest version of GrandNode with source code. You will get the package with an application, please extract the package and open the GrandNode.sln file:
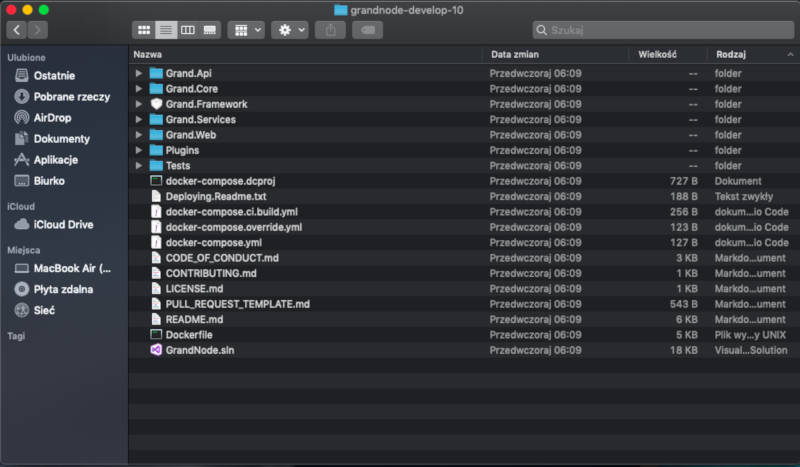
As I mentioned in the previous chapters of this guide, in the GrandNode installation tutorial, we used the newest development version, due to ASP.NET Core 8.0 implementation. If you want to install the previous version, reach us and ask for help.
4. Common issues during the installation process
Commands that I've pasted don't work
It's pretty often an issue. If some of the commands that I've used in this guide don't work, for example:
- You've tried to use sudo chown –R www-data:www-data /var/webapps/grandnode and it failed, that means that you should try to enter this command manually.
5. Have more complicated requirements?
GrandNode can be a scalable e-commerce software with Redis Server, Load Balancers, CDN servers with MongoDB replication. We know that this process may be frustrating and problematic. We are here to bring your ideas to life. You can always base on our experience and knowledge. If you don't have time or resources, it's the best time to send us a message, we will install GrandNode in any configuration for you with pleasure!