
If you read this article, it means that you are wondering how to create a SaaS eCommerce platform. GrandNode provides you with the simplest way of creating your own SaaS business. Everything you need is free, advanced, open-source eCommerce platform - GrandNode.
List of content
- 1. What is a SaaS eCommerce platform
- 2. Multi-Tenancy in GrandNode
- 3. How to create a tenant in Advanced Multi-Tenant?
What is a SaaS eCommerce platform?
Long story short - SaaS eCommerce platform is an e-commerce software delivered to the customer as a cloud-based system, that can be accessed through the web browser.
What are the benefits of a SaaS eCommerce platform?
Here are the main benefits of opting for a SaaS e-commerce platform:
- Always up-to-date - It's one of the most important benefits of the SaaS eCommerce platform. Software developers release a few updates during the year, if you rely on standard open-source software, you will be forced to update every store that your customers have manually or if you are a store owner, you will be forced to do it on your own. Everything changes with the SaaS software where the main administrator updates all of the tenants, so you don't have to do anything with your store.
- Monthly subscription - SaaS e-commerce is sold as a monthly subscription and is usually way cheaper than purchasing a traditional e-commerce platform. It's a great way
- Easier maintenance - When the SaaS e-commerce is hosted with the provider, the provider is responsible for software maintenance, hosting, uptime, performance, and speed. As in our case, you just care about your business, the whole hosting, and other stuff in our case.
- Quick to install - SaaS e-commerce is the easiest and quickest way to launch an online store.
SaaS is a new reality in the digital world. In a nutshell, we can compare the SaaS eCommerce platform to the shopping mall. If you look at the mall you will see some kind of shared area with independent stores inside. Everyone has their own entrance, design, employees, but they use the shared infrastructure of the shopping mall. It's a great way of delivering software.
Your users can easily use your eCommerce platform and create their online store without the need to install it on their own. Software as a Service is one of the main cloud computing models between Infrastructure as a service (IaaS) and Platform as a service (PaaS).
Software as a Service is a model of licensing and delivering.
As it was mentioned before, the biggest advantage is a fact that the user receives the software immediately without unnecessary additional doubts and work.
You as a developer or owner of the SaaS eCommerce platform are responsible for your users, customers, tenant. They just order a subscription and expect a secured, fast, efficient, advanced online store.
All of that things are possible to achieve with GrandNode - our open-source eCommerce platform. SaaS eCommerce platform should be built with a multi-tenant feature. GrandNode offers various models of multi-tenancy. All the methods of building a SaaS eCommerce platform are described below.
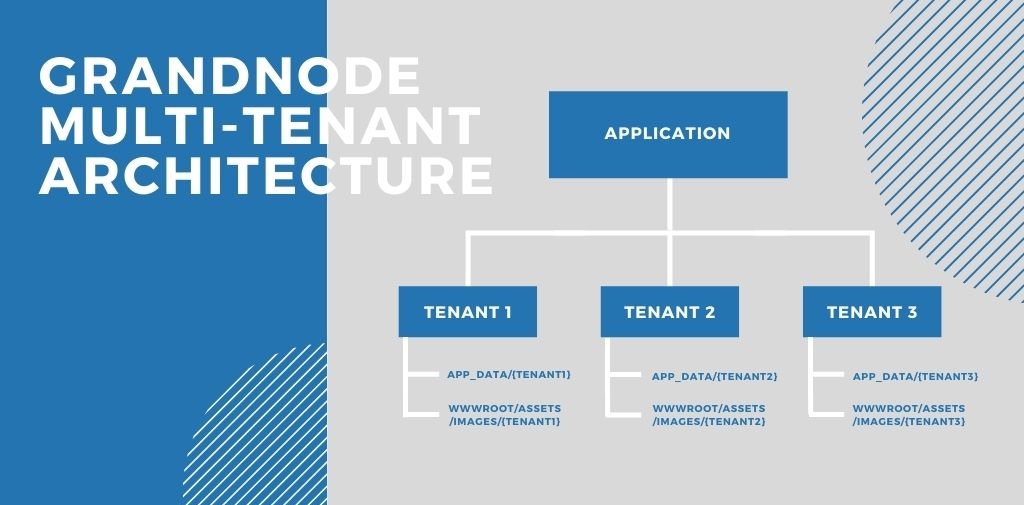
Multi-Tenancy in GrandNode
In GrandNode you can manage multi-tenancy in two ways. First, introduced in GrandNode 2.0 1.0.0 you can create a multi-tenant as a multi-service application. To create a tenant, you should run a new instance of an app with a parameter. The second way will be introduced in a 1.1.0 version with a premium plugin - Advanced Multi-Tenant.
Let's start with the older one - multi-tenancy based on multiple independent services.
The whole idea is presented in the graphic above. If you want, to check more information about the previous model of multi-tenant in GrandNode 2.0 you should definitely check our blog post about basic multi-tenancy in GrandNode 2.0 which can be a great extension to this article.
In the first, basic model, as you can see, you can run a single application, then re-run it with a parameter Directory, which defines the particular tenant. What's more? Once the application has been run with the new parameter, you will find new folders in your GrandNode copy, strictly related to the tenant. In the App_Data main folder, you will find the subdirectory with the tenants' name - i.e "Tenant1". Inside you will find three files - Settings.cfg, InstalledPlugins.cfg and appsettings.json.
However, during the further tests, we noticed that this scenario, won't be useful in some cases, that's why we've decided to create a plugin and provide a totally new model of multi-tenancy in GrandNode.
Here comes the brand new Advanced Multi-Tenant plugin.
The current model gives you the possibility to create tenants without multiple services. It's a clear multi-tenant model where users are linked with different tenants via the single launched application with different, independent databases.
The most important changes that the Advanced Multi-Tenant plugin brings to GrandNode:
- Creation form - The administrator of the main store is able to create tenants directly from the admin panel and dedicated form. for a tenant. Just fill the specified form and send it to the store owner. Store owners will be able to manage requests, approve them or not and create stores for particular users.
- Overwrite the default behavior of GrandNode's multi-tenancy - Instead of running multiple services, you are able to run as many stores as you want on an independent database and on a single service.

Picture source: https://codewithmukesh.com/
How to create a tenant in Advanced Multi-Tenant?
First of all, after an installation of the plugin, you just need to enable proper permissions in the Configuration -> Permissions page. Scroll down and find the permissions related to the Multi-tenant plugin.
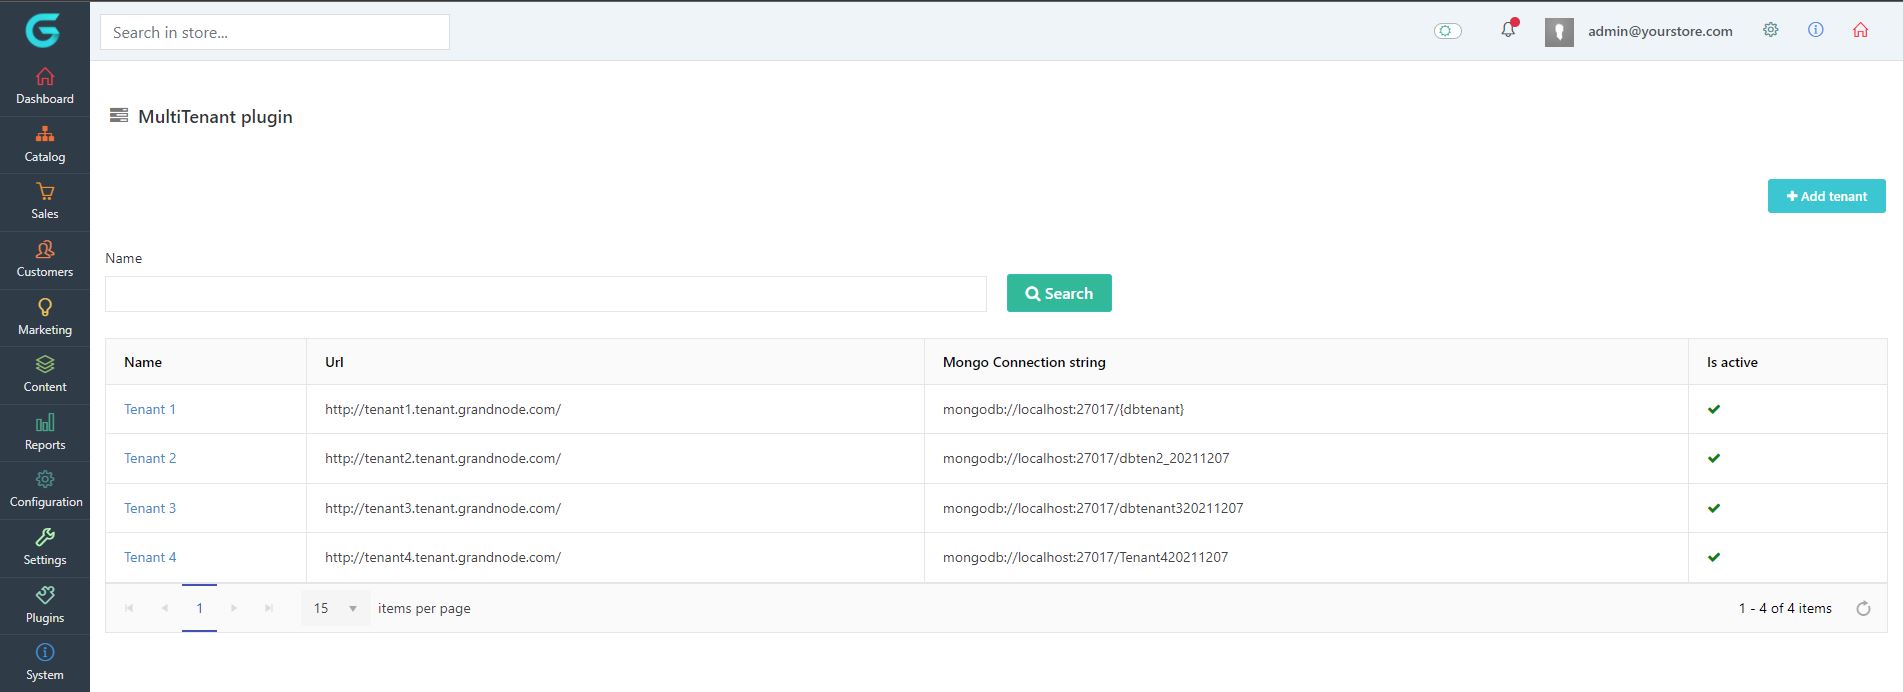
After that, you will be able to access the Tenants list and the Configuration page.
Open the Configuration page and configure the main settings of the plugin.
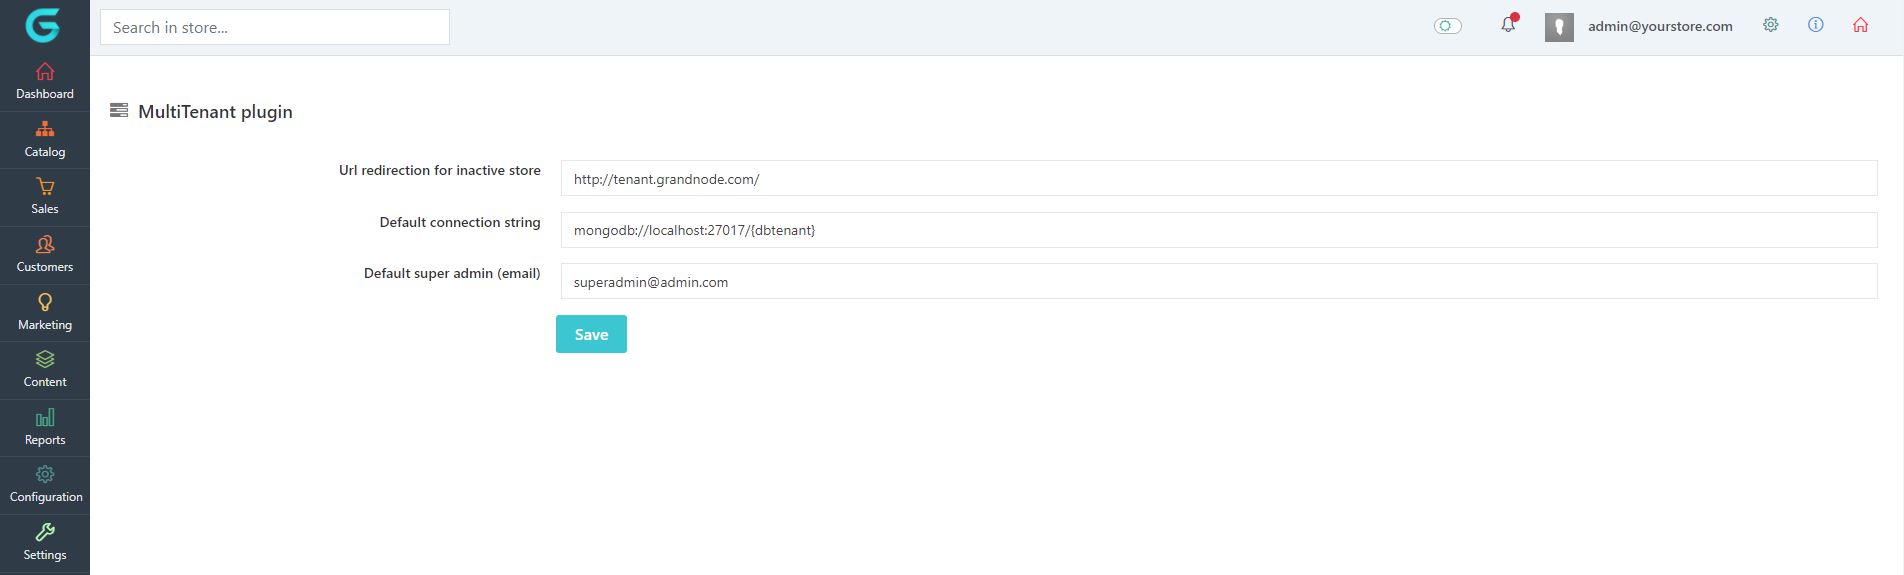
Url redirection for the inactive store - when your tenant is not active and the customer will try to access it, GrandNode will redirect the customer to the URL that you provide here. It can be your main store or landing page, anything you want.
Default connection string - is a default connection string, you will be able to modify the {dbname} directly on every new tenant.
Then jump into Tenant List and press the Add new button.
The creation process is straightforward. It can't be simpler. Everything comes to filling the necessary fields in the creation form.
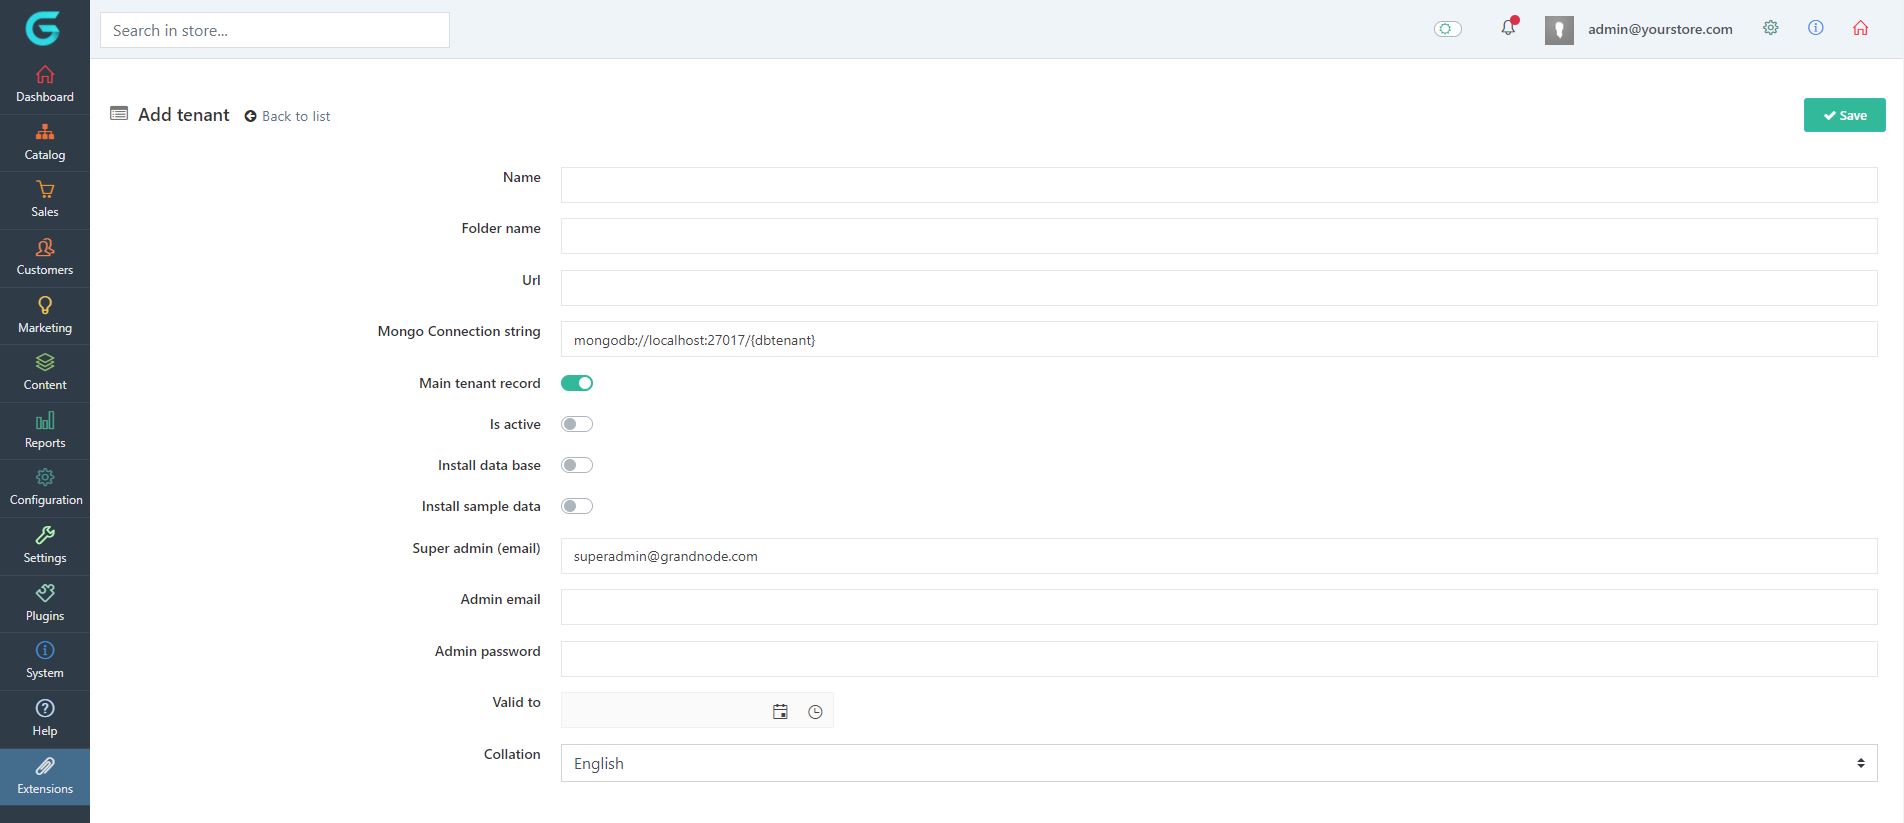
Name - Name of the tenant
Folder name - Name of the tenant folder, it's used to keep the generated thumbs for example. You will find it in the wwwroot folder.
Url - Url of the tenant
MongoDB Connection String - to create a database
Main tenant record - You should set this if you create the main tenant, if you want to add a new domain to an existing tenant, you should leave it turned off.
Is Active - Is the tenant active or not
Install database - Check if you want to install GrandNode on the new database
Install sample data - Check if you want to provide the tenant to your customer with sample data preinstalled
Super admin email - Email of the super admin user
Admin email - Store owner email address
Admin password - Store owner password
Valid to (optional) - If you offer a SaaS eCommerce platform with monthly fees, you should save there a subscription end date.
That's all. After pressing the save button, the tenant is up and ready to sell.
Now it's time for some technical information:
The plugin comes with source code so after purchase you are able to customize it, modify and personalize as you wish.
Furthermore, By default, to provide the highest security, the tenant has some limits, which can be easily modified and customized with source code:
- Scheduled Tasks
- Plugins management
- System information
- Customer Reminders
- Auction system
- External Authorization is not supported
- Push notifications are not supported
- Tenants don't have the possibility to upload their own pictures via elFinder.
Important information: tenants have only one scheduled task supported at the moment, it's the "Send emails" task and it's configurable directly from the main store. If you want to use other tasks, your developer has to develop them. Every tenant has access to the maintenance tools like clearing requests, logs.
Also please note that if you use multiple domains on a single tenant, emails will be sent from the main tenant email address.
If you want to open your SaaS eCommerce platform, the Multi-Tenant plugin is for you. Just stay tuned, Multi-Tenant plugin is available here https://grandnode.com/multi-tenant-ecommerce